I am currently planning my next tour, a 3 week loop in Italy's Dolomite mountains (touring plan here) and I had to decide if I wanted to fly with my usual touring gear from San Francisco, where I live, to Milan, my starting point. Doing so required me to check 2 large cases (one for the bike, one for the gear) and to stuff my carry-ons with as much as I can. Not only is it very hard to maneuver all this heavy luggage to and from the airport, there are substantial checked baggage fees on international flights. As a result, I began wondering if I might be able to reduce my touring gear down to the point where I could fly it all to Italy within the airline limits. This seems like an impossible task, given that my bicycle box has to be checked. Yet, after a lot of thinking, buying some new touring equipment, and a lot of trial and error, I've been able to reduce my touring gear to the point where I believe I can carry it all within the checked and carry-on allowances. Getting Set UpThe first major tour I took with my own gear was from San Francisco to Los Angeles in 2004 (journal here). My gear fit into 6 categories: tools and spares, camping equipment, cooking utensils, food, electronics, and clothes, both on- and off-bike. To carry all this, I decided to use 4 panniers and 2 racks. I put certain often used items into a rack bag that fit onto a platform on my Old Man Mountain Sherpa front rack. Here is my bike, its 2 racks, and the front bag.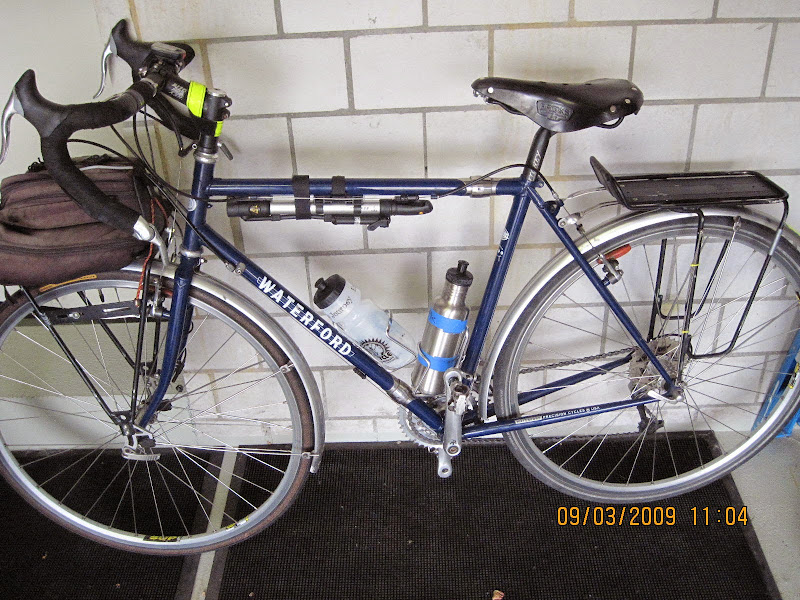 This photo shows my full set-up while on that trip. 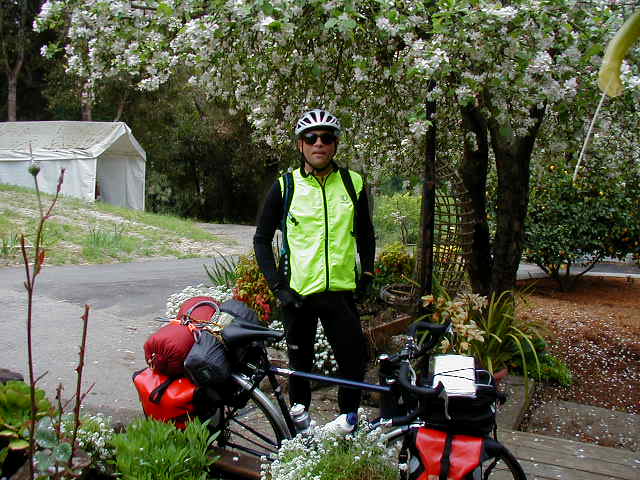 This became my bike touring set-up: 2 racks, 4 panniers, 1 rack bag. I never weighed it, but I'd guess all tolled it was between 30 and 40 pounds. While I adjust my packing list for every tour, I always start with the assumption of 2 racks and 4 bags. I've come to realize that I don't like camping. Thus, I only carry camping equipment if there are sections of my route without other overnight options. While this results in taking less weight, since most of the camping gear goes on the top of my rear rack, it didn't diminish my need for the racks and bags. Riding a bicycle loaded in this way requires a fair amount of pre-tour training. I usually spend 2 months adding weight to my bike and length to my rides to get accustomed to pushing it down the road. Dealing With Weighty QuestionsOver the past couple of years, I've been reading more and more about "lightweight" touring. People have published pamphlets on their set-ups, written articles full of lists and photos, and posted on web forums when people ask about how much gear to carry. While I've read much of this and know what it is like to push a loaded bicycle up a long, steep incline, I didn't see any reason to completely change my set-up just to "go light." When I thought more about it, I realized that the main difference between what I did and the "lightweighters" was how they carried their gear. Steel racks and waterproof panniers are sturdy, but also heavy. Four empty Ortlieb panniers weigh over 7 pounds. The Old Man Mountain Sherpa front rack is 2 pounds. My standard Jannd rear rack weighs 1.75 pounds. Added all up, my set-up started at 11 pounds without any gear! Instead of heavy panniers, the "lightweighters" might use thin nylon stuff sacks or waterproof bags. Instead of a rear rack, a bag might be hung off the seat post or the saddle. Others used frame bags and bedrolls attached to the handlebars. To me, some of these set-ups looked more like insects than bicycles! There also was the question of gear. Clearly, one way to save weight is take less on tour. Over the years, I have created a list of gear that fits the way I tour. While I could get by with less, I wasn't ready to strip out extra pairs of underwear, socks, biking shorts and gloves just to save a pound or two. If my bike was heavier, so be it. Seeing The Light(weight)When I checked out the flights to Italy and their baggage rules, I had to decide if I was willing to pay the extra money and to take on the task of moving 2 heavy cases and all the other luggage around. I've flown with this much gear many times and every time I struggle to do it.Envisioning the effort needed to get all this stuff to Italy, I began wondering if there was a way to get everything I needed for my tour within those limits. At first, I thought it was impossible. But, the more I thought about it, the more ways I came up with to minimize my set-up. Spacing OutThe first step in reducing my travel requirements was to get rid of both my racks, as they can't be carried on a plane and won't fit in my bike box. But, how would I carry my gear? After a bit of searching (and false starts), I found the Salsa Down Under Front Racks. These are low-rider racks that are not connected to one another and weigh just over 1 pound for the pair. They attach separately to the drop-outs on my front fork. Here is a photo: Another plus of these racks is that they might fit in the box with my bike, since I can't carry them onto the plane. For now, that has to remain only a possibility as I don't want to disassemble my bike just to test this out. Though, obviously, I will have to do this at some point. When I do, I'll update this article. Once I removed my racks and installed this one, I had 2 problems. First, could I get all my gear into just 2 panniers that would fit on this front rack? Second, where would I put all the stuff I carry in my rack bag, as I had now lost the platform it sat on? First to go was my cooking equipment. I have never toured without being able to cook my own food. Not only is this a good safety measure, it also meant that I could always find something vegetarian to eat, even if I had to cook it myself. But, there simply wasn't the room, so I took it out. While this stuff doesn't weigh much, pots and fuel containers take up a lot of room! But, I'll be touring in Italy where finding vegetarian food shouldn't be a problem. While I like to carry 3 pairs of biking shorts, on my last couple of tours, I've only really worn 2 different pairs. So, that was easy. Just to see if I could even do this, I took out a few other extras, like gloves, handkerchiefs, and bandannas. After assembling what I had left (not counting the biking clothes I'll be wearing): toiletries 1 jersey 1 t-shirt 1 down vest 1 pair of pants 1 pair underwear 1 pair of socks 1 pair biking shorts 1 handkerchief walking shoes I had a hard time cramming it all into my 2 front panniers. Knowing that I'd also want to carry some extra food, I didn't think this was going to work. Not giving up, I checked to see if my rear panniers would fit on the new low-rider racks. They did. But, they hung down over an inch farther. Since I was new to low-rider racks, I was concerned that this extra inch might cause some safety issues as I rode. I asked about using rear bags on low rider racks at the touring forum at bikeforums.net and got some useful feedback, including suggestions that the best idea was to try harder to cram everything in the front panniers and that there are people who have used rear racks on low-rider racks. Taking the packing advice to heart, I managed to shove all my gear into just my front panniers. I even managed to have a little room left over for some food. It's In The BagNow, I had to deal with the gear in my rack bag. This is mostly things I might need to access quickly, such as tools, spares, lotions, energy bars, etc. I went to see Larry at Noe Valley Bikes, my local bike shop, and he pulled down a Jannd Mountain Wedge 3 saddle bag. It is about the same size as my previous rack bag, when expanded, and hangs down from the saddle. For stability, it has 2 bungee cords that connect to drop-outs on the bike.After expanding it out to the maximum, I managed to shove everything in the rack bag into it, plus my first aid kit and bike lock, which normally live in my panniers! Here is a photo of it installed on my bike:  There was one last detail, my camera. I like to take lots of photos when I tour and I always want my camera to be handy. In my previous set-up, I put the camera in a side pocket of my rack bag, where I could easily reach in, take a photo, and put it back with ease. Since I no longer have a bag on the front of my bike, I needed another solution. One idea is to get a handlebar bag. But, my bike has in-line brake levers that stick out from my handlebar. To accommodate these levers, which I really like, I'd have to get a bag that attached away from my bars. While this is possible, I decided to try for a smaller solution, a small pouch that fits on my top tube, often called a "bento box." After a fair amount of looking around, I discovered the Timbuk2 Goody Bag Top Tube Bag. Not only was it big enough for my camera and a few other bits, it has a clear plastic slide-in cover for my iPhone. Now, instead of using an armband carrier for my iPhone, which I don't really like, I can use the top tube pack. Here is a photo of the front of my bike:  So Far, So GoodWhen I add up the cost of the new front racks and the two bags I've purchased, it comes to just over $150. This is well below the cost of checking a second bag to Italy and I have equipment that I can reuse.Now that I had most of my gear on the bike, could I ride it? After 10 years of riding my bike set-up one way, would I find the new arrangement acceptable? Here is a photo of my bike's current status: 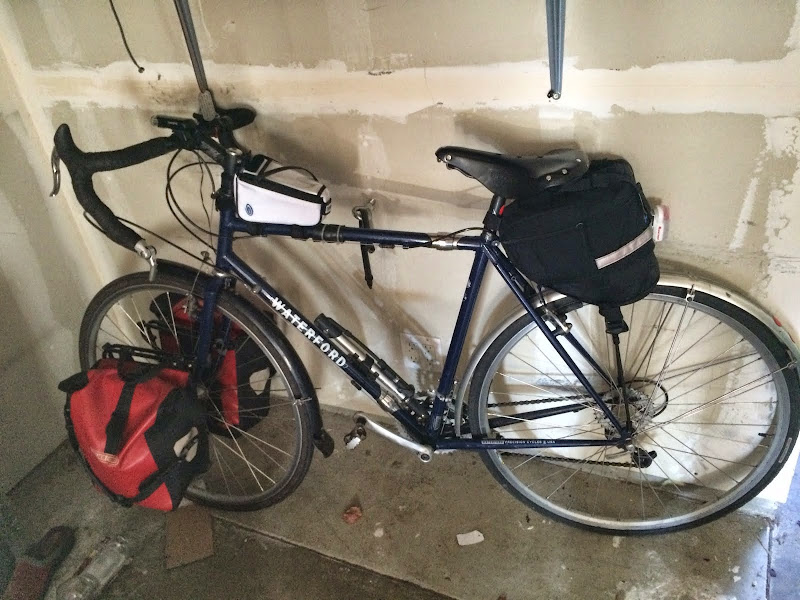 I have now been riding with this packing method for several week. The steering is much easier, even with loaded panniers on the front, then it was with the previous rack and bag. What's more, I am now riding around fully loaded as I begin my training for the ride in Italy. For all my previous tours, I didn't start adding weight to my bike until about 2 months before the tour started. So, not only am I packing less weight, I am able to train more effectively to carry it! At the moment, I am very pleased with this new set-up. Unresolved QuestionsThere are 2 issues yet to be addressed. First, can I get all this gear into a single bike box (50 pound limit), a roller bag and a carry-on? Second, how will this reduced gear work on an actual tour?Packing my bike in its box requires close to 2 hours of dis-assembly, wrapping and packing. It takes a similar amount of time to reassemble. Before I can be certain that all my metal gear (connectors, racks, bike pump) will fit in the box with the bike, I will have to actually perform this exercise. For the moment, this trip is still in the early planning stages. I haven't purchased tickets, so I'm not yet ready to do all the hard work to test if I can get it all in the box. I have done a couple dozen long bike tours in the past 10 years. I have a pretty good idea of what kind of needs I have while riding around. While I have pared my gear list down, it doesn't seem like I am leaving out anything essential. But, there isn't a lot of room on my bike for extras, like food and water. Only a real tour will put this to the test. I will continue to update this article as I learn more about this new set-up. |