While I don't particularly enjoy riding a bike in the rain, it is something every bicycle tourist has to be prepared to do. I always carry rain gear when I tour. In addition to a thin, yellow, non-breathable rain shell, I also carry rain pants and a shower cap to cover the holes in my helmet, should it really start coming down. The unsolved problem for me is my shoes. I hate riding when my feet are soaked. I've tried neoprene booties, but they weren't waterproof. I've tried waterproof socks but find that I never seem to have them on when the rain is at its heaviest. In addition, the socks do nothing to keep my shoes dry. There are lots of options. This thread at bikeforums.net covers several available rain shoe options. Brainstorm in a Rain StormIn May, 2011, I did a one month tour of the UK (journal here). While the weather was very nice in Scotland, it started to rain once I was back in England. Near the end of my tour, I rode through the Peak District and found myself struggling up the Holme Moss, one of the "Peaks," in a miserable rain storm. Like the rest of me, both my shoes and socks were completely soaked through. While I ground away in a low gear bemoaning my sodden feet, an idea came to me about how I could make my own rain booties. I'd been considering this for some time and the main problem was the part that covered the front of the shoe. It needed to keep the top of my shoes dry and to stay on while I pedaled but not be attached across the bottom of the shoe, so that I could still clip into my pedal and to prevent it from wearing out when I walked on it. In a flash, the idea of using a slit plastic, disposable water bottle as the front of the bootie came to me. Plastic bottles solve all the above problems. When sliced on one side and cut to the right length, they not only cover the top of my cycling shoe, but they "hold" on without needing attachment across the bottom. What's more, since these bottles are disposable, reusing them is environmentally beneficial, they are easy to find and usually free. Here is my size 10 1/2 biking shoe and a 16 oz water bottle. 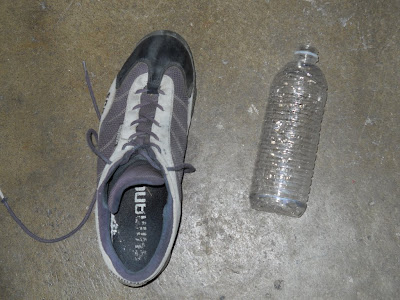 Here is the sliced water bottle on the end of my shoe.  The only problem I see with this design is that the bottom of my shoe is open to the rain and the wet. I suspect that in some circumstances, water might infiltrate the sole and soak my shoes and feet. But, this is much less of a concern than the falling rain and water running down my rain pants. Keeping my socks dryThe water bottle only covers the front part of my shoe. I needed something entirely different to cover the back part of the shoe and my socks as they run up my ankle. I'd already decided that the best way to keep this part of my leg dry was with a waterproof gaiter. A gaiter is a piece of flexible, waterproof cloth that covers from above the ankle to the bottom of a shoe. Attaching the gaiter to the slit water bottle would be done with velcro. There are two benefits of this attachment system. First, it won't lose grip in the rain. Second, it allows the water bottle to be replaced easily should it break apart or fail for some other reason. Creating Something Out Of Whole ClothAfter I finished my ride and returned home, I began designing this rain cover. I cut up several plastic water bottles, shoved them on the end of my cycling shoes, tried to clip into my pedals, and walked around in them. For the most part, this worked OK. The next step was trying to create a gaiter that would attach to the top of the water bottle, come down the side of my shoes and along the sole, as well as, all the way up above my ankle. After some experimenting, I realized that the best design would be one that attached in the back. This not only allowed me to pull the gaiter tight, it also made it real easy to slip it on and off. I found an old gardening apron and using safety pins was able to wrap the top of my shoe and shin in it. I then cut the fabric more to fit, stuck on some velcro, and had a working prototype. I did some more trimming and then measured it. Here is the pattern. 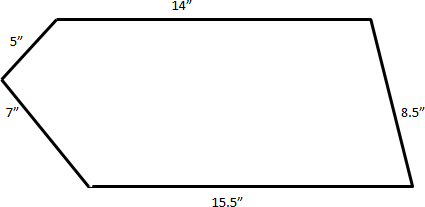 Note that the measurements are of the hemmed gaiter. The fabric should be cut about half an inch bigger all the way around to provide space for the hem. It's a Shoe-in ™As it turned out, my wife had some Gore-Tex fabric that was large enough for me to cut out two gaiters. I'd never used as sewing machine, so she showed me how to do that and I was able to sew a hem all the way around both gaiters, though not very straight. Next, I bought some stick-on velcro which adhered strongly to the Gore-Tex and the plastic bottle and stuck it on both of them. Here is where the velcro goes. 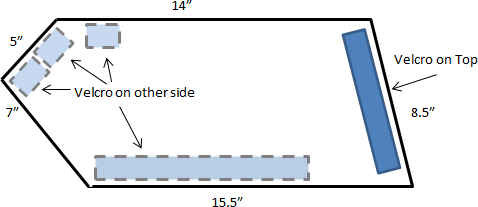 Here is the sewn-up gaiter with velcro attached.  If you look closely, you can see the bands of velcro on the underside of the gaiter. Here is the slit bottle with velcro.  Here are the bottle and gaiter attached to one another. 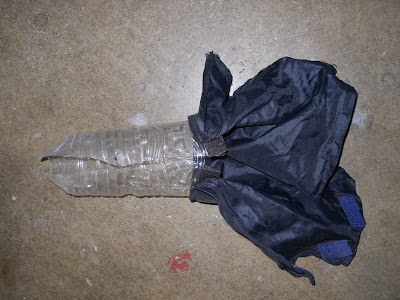 Here is my shoe inserted into the rain cover but not synched in the back.  It took a bit more measuring and adjusting to get the strip in the back lined up. In the end, the fabric covered the top of my shoe and socks. View from the top.  View from the side showing the gaiter all the way down to the top of the sole.  A couple other things that I really liked about my design was how light they were and they fit into one another for easy storage and transport in a pannier.  One potential downside is that they look a bit dorky. This doesn't bother me as I view rain gear as functional not fashionable. But, it might put some people off. It would look better if the water bottle part was black so that it blended in with the gaiter. The Water TortureOne motivation I had for creating the Shoe-in was that I was scheduled to take a 12 day tour starting in Bellingham, WA and going down to Newberg, OR (journal here). Since, it was likely to rain some of the time, it would give me a chance to test my new rain covers. As it turned out, it rained the entire first day of my Washington ride. I put on the Shoe-ins before I started riding for the day and wore them all day. My results were mixed. First, I had no problem clipping in or out of my pedals. Putting my foot down on the road or walking around usually forced the water bottle front to lever up off my shoe and I'd have to reach down and push it back on. This was a bother but not a show stopper. The gaiters kept the part of my socks that were not in my shoes completely dry. My shoes got wet, but I suspect this was from foot sweat and not rain. It was a very humid day and I was sweating profusely. While my shoes were wet enough to require the insertion of newspaper overnight to dry, they weren't soaking wet, like they'd have been without any shoe protection at all. In this sense, it isn't clear how well the Shoe-ins actually work. It didn't rain for the next 11 days. While this made for great bike touring, it didn't allow me to further test the Shoe-in under actual conditions. I don't normally ride at home in the rain and I doubt I'll do it just to test a rain bootie. Thus, true field results will have to wait until I take another bike tour and get caught in the rain or someone else in a rainier climate follows these directions, makes a pair, and sends me a report. Shoe-in is a trademark of Ray Swartz, 2011 |