Over time, like most riders, I've added several battery powered devices to my touring kit: an iPhone, iPad, Bluetooth headphones, camera, running lights, among others. In addition to food and water, I now need to make sure I have enough power before I ride off for the day! This is why I am excited to test out the PedalCell (tm), a power generating dynamo that runs on the rim of the wheel. I use my iPhone for navigation, photographs, messages, contacting hosts/hotels, email, route tracking and other tasks. If I am not careful, the phone will run out of power before I run out of day. This causes all kinds of problems from contacting hosts/hotels to actually locating my place for the night. On more than one occasion, when my phone went dead, I've had to ask passers-by for directions to an address. Not always easy when I don't speak the local language! This is a long, detailed review. So, let me summarize my results at the beginning for those not necessarily interested in all the specifics: I was impressed with the PedalCell and would highly recommend it to people who have a need to charge USB devices when they are on tour. Every time I rode with the PedalCell, my iPhone ended up with more power at the end of the ride than when I started, no matter what apps I ran on it or how long I rode. Holding Onto PowerBecause of my concern about preserving my phone's power, there are some things I'd like to do that I don't. For example, there are several apps available that will create a track of the route ridden. Knowing the actual roads and paths I took without stopping and marking them would save me time and be useful for journal creation, as well as, advising others on possible routes. The same goes for voice navigation. But, I have found that they suck too much power given the other, more important, uses for my phone. The same goes for accessing cell service, sending messages, and checking emails, which I often have to ration during the day. If I carried a back-up battery, I would be able to run these and still not run out of power. But, these back-up batteries are one more thing to charge and add a bit more weight to push over the hills. I actually have a nice one, a 10,000 milliAmp (mA) Anker that weighs 1/2 a pound and will fully charge my iPhone at least two times. But I've been reluctant to add this weight to my kit and have, instead, simply gotten accustomed to touring without these apps. Talkin 'bout My GenerationThere are several ways to generate electricity while riding. There are solar panels, hub generators, even tiny fan windmills that fit on the handlebars. It doesn't seem that solar cells (or mini-windmills) work well enough to justify their cost and hassle. Hub generators work but are expensive, aren't all that efficient, usually require a storage battery, and add drag that can't be turned off when not needed. I've never considered any of these methods. Instead, I manage my power usage and rely on electrical outlets at hotels, cafes, and libraries, when necessary.I hadn't given this any additional thought when I read about the PedalCell, a new device that creates power by turning a small generator with the rim of one of the wheels. (Source: PedalCell) It reminded me of those old bottle generators I had as a kid that ran my headlight.  (Source: restoringvintagebicycles.com) But, the PedalCell is a 21st Century dynamo. First, it is specifically designed for devices that charge via USB connections, not headlights. Second, it is a sophisticated piece of equipment that senses what is being charged and figures out how best to do so. Third, it has 2 charging ports, one for smaller things like lights or GPSes, and one, more powerful, for larger devices like phones, tablets and batteries. Electrifying DetailsThe PedalCell consists of two main parts: the generator and the "smart" power hub. These are connected by a one meter long wire. Additional wires are needed between the power hub and the devices being charged, which the user has to supply. This makes for lots of wires, not necessarily the best thing to be hanging off a bicycle.One important detail is that the PedalCell uses USB C plugs,  not the older, but still in common use, USB A plugs.  While the world is currently converting from USB A to USB C, lots of devices still use charging cables with a USB A male end (the one you plug into the wall charger). These won't work, unconverted, with the PedalCell power hub. Either you have to have a wire with a USB C male plug or you have to use an adapter. To help solve this compatibility problem, PedalCell includes a USB A to USB C converter in the box. Should someone need more, converters can be bought from many places, including PedalCell. Becoming Power-fullThe PedalCell comes with everything you need to install it on your bike. This includes the generator, the power hub, cables, screws, spacers, a 4MM allen key and a USB C to USB A converter. The rubber spacers are used to secure the generator arm to the bike. Different spacers are for different width connection points, such as, a fork or seat stay. For installation instruction, there is a 7-minute step-by-step video on the PedalCell website. In addition to showing how to connect the PedalCell to your bike, this video has a couple important cautions to be observed and is worth watching prior to installation. For the most part, how to connect the device is obvious. The generator arm has to be attached to a part of the bike with access to a wheel rim. The most likely spots are the front fork or rear seat stays (the bits of your frame that goes between the rear wheel and the seat tube). What complicates things are racks, panniers brakes and other bags. I have two bikes and both are racked with panniers. One is a Waterford touring bike with a low-rider front rack to hold panniers.  The other is a Bike Friday New World Tourist, a folding touring bike. It is setup with a rear rack and panniers.  On both bikes, I attached the PedalCell to the front fork below the brakes. 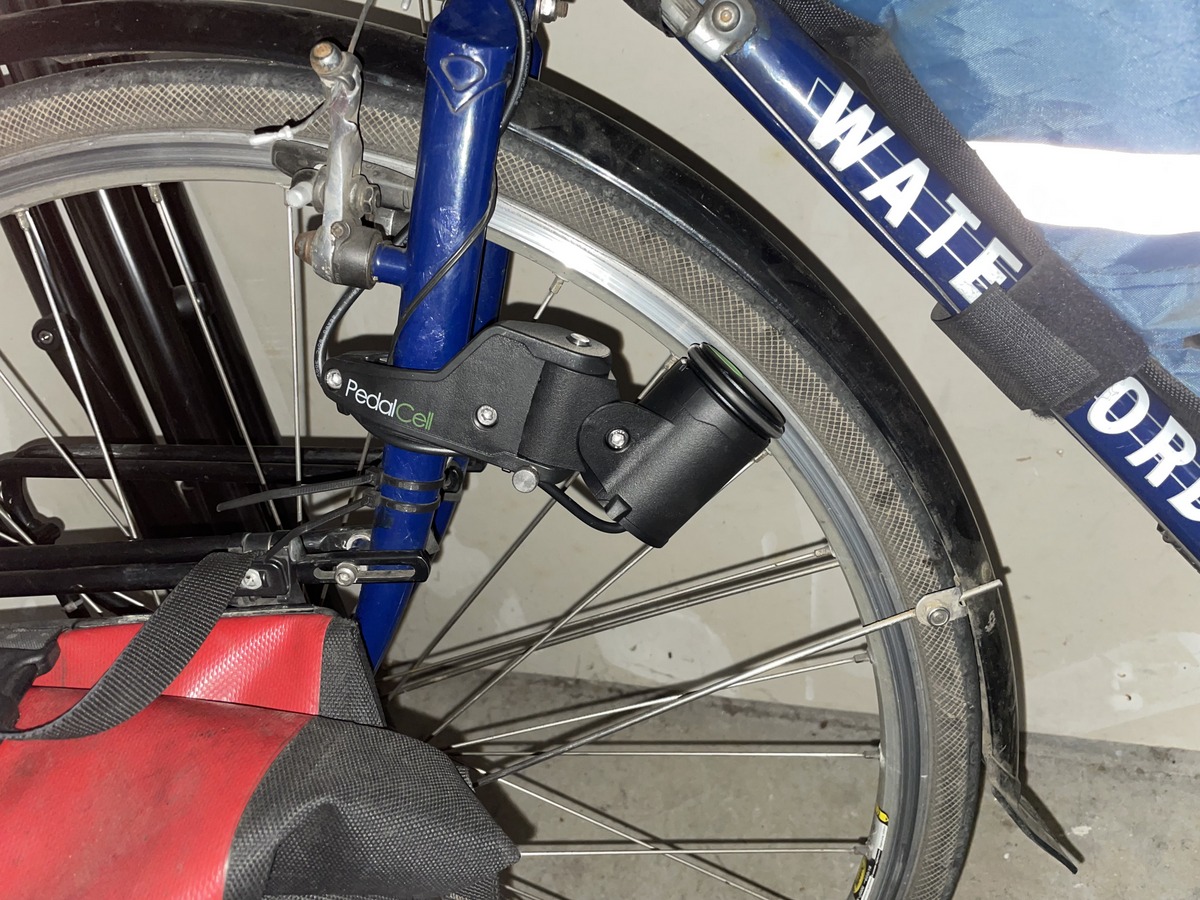  Note: There is a small front shelf in this photo but it isn't for panniers. I use panniers mounted on a rear rack on the Bike Friday. It doesn't matter which direction the PedalCell is facing as it works going either way. It was advised on the PedalCell website to install the generator facing backwards on the left side of my fork as my bikes have cantilevered brakes. Once the generator is affixed to the bike, the generator puck has to be adjusted so that its rubber gasket runs on the rim and is set to the proper angle (described on the installation video). There is a single set screw to do this and it took me less than a minute to get it right. One point that is emphasized on both the video and a sticker on the generator is to be aware of the lock screw for the generator arm. Unlike hub generators, the PedalCell can be disengaged from the rim by simply bending it back until the lock screw clicks. This holds the generator away from the wheel.  With the generator attached, the next step is siting the power hub. The power hub has a rubber cinch strap on its back for securing it onto the bike. Since the connecting wire is 1 meter long, I had a fair number of options. It is also possible to remove the cinch strap entirely and put the power hub in a bag or pannier. The cockpit of the Waterford is a bit crowded,  but I decided to place my power hub on the handlebar stem. It is recommended that the power hub be placed facing down to prevent water from getting into it. There are small rubber covers for the USB plugs, but water in the power hub causes problems, so I angled it down and plugged it in. 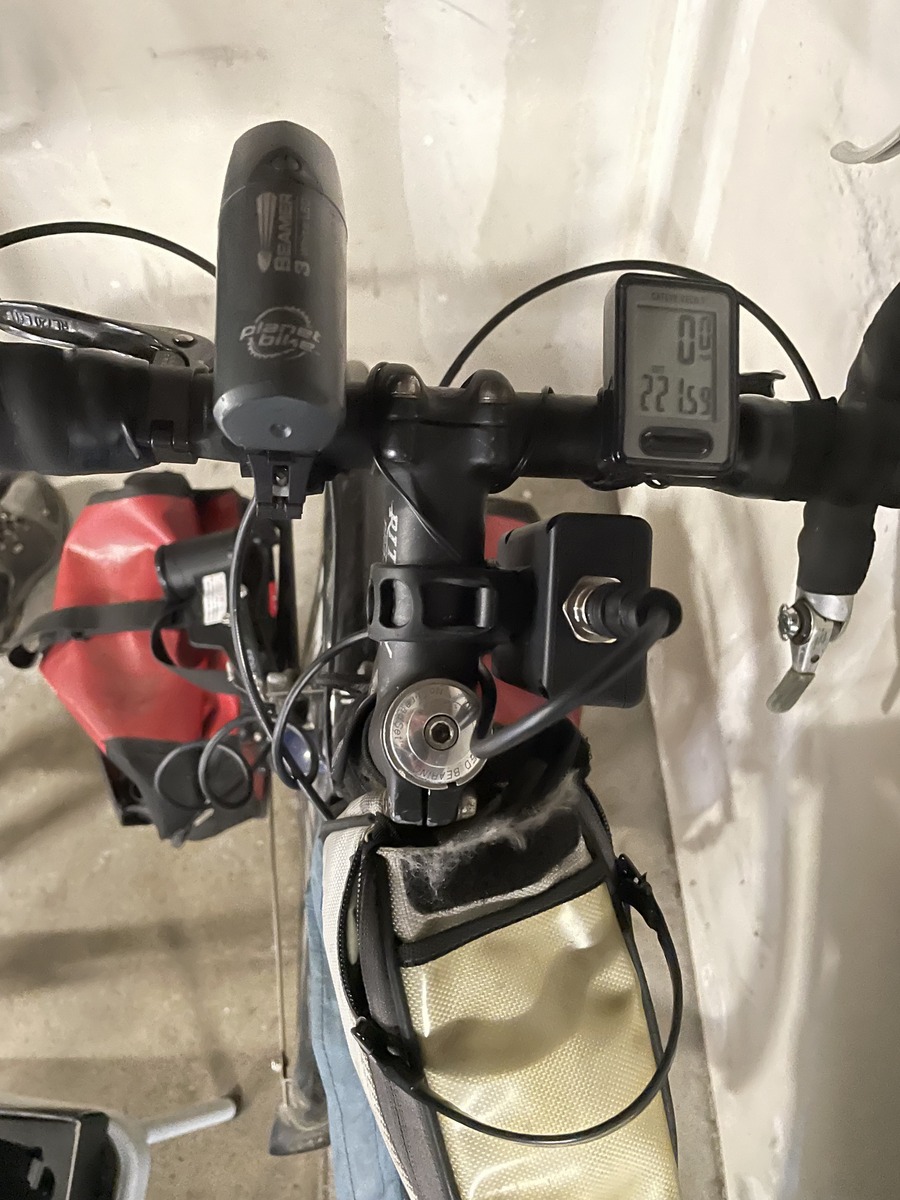 In total, the whole operation took about 15 minutes. Here is the finished install (note that the panniers are not on the bike in this photo).  As an experiment, I also attached the PedalCell to my seat stay. Due to the design of the Waterford, I had to mount it on the drive (right) side of the frame.  Note that the Power Hub is installed on the seat tube. Incidentally, something that is easy to attach to a bike is also easy to steal off a bike. If theft of the dynamo is a concern, PedalCell sells a "Security Kit" that consists of tamper-resistant fasteners to replace the hex screws that come in the regular box. I didn't get a set of these fasteners so can't comment on them. Feet Don't Fail Me NowUltimately, the power generated by the PedalCell comes from your legs. The faster (slower) you ride the more (less) power the dynamo creates. The same is true of length of time the PedalCell is engaged; longer equals more. You will generate more power on a day of riding flat or downhill terrain, then climbing mountains all day.It is important to be realistic about how much power you can produce while riding a fully loaded touring bike. Just because your bike has a generator with 2 charging ports doesn't mean your legs can fill those ports with power. Understanding how much electricity you can produce during a day's ride will help in deciding what to charge. The key factors in PedalCell's power generation are wheel size, distance between the edge of the tire and the generator, speed, and time. There is a spreadsheet on the PedalCell website that will calculate how much power it produces when all these values are entered. Note that the PedalCell is a 5 Volt system so Amps are calculated by dividing Watts by 5 (Volts). Thus, 3 Watts are equivalent to 600 milliAmps (mA). Who's In Charge?You, also, need to decide how best to assign the slots on the PedalCell. In my experience, it will take some time testing the PedalCell with your set of devices. The low power, but high priority (always on), slot produces 600 mA. That is enough to charge devices that are either a) of high importance, like a GPS navigation system, or b) don't require much electricity to fill up, like a headlight. While this port can be used to charge a phone, my experience suggests that this isn't the best option if you are only charging a single device.The high power port can generate up to 2.4 Amps (12 Watts). But, this isn't prioritized and will only produce power after the low power port satisfies its electrical needs. If the low power port isn't in use, all of the PedalCell's output goes to the high power port. However, the amount of power generated by the PedelCell is determined by the speed of one's bike, which constantly changes. Some devices, like the iPhone, have power management software that controls how much charge they will accept to protect against faulty chargers. In order to maximize its electrical output, the PedalCell needs to "negotiate" with USB devices as your speed varies. On an iPhone, these "negotiations" involve stopping and restarting the charging sequence. IPhones make a tone when they begin charging. On a 3.5 hour ride and the iPhone in the high power slot, I heard this tone dozens of times. It wasn't unusual to hear it 2 or 3 times in a quarter mile. This doesn't hurt the phone and, at first, it was a bit annoying. Eventually, I got used to it. What's In StoreOne question I had was about batteries. I don't carry a battery when I tour and I'd prefer not to. Since I don't camp and almost always have access to electrical outlets, a battery hasn't seemed necessary. But, for tourists who camp or have several devices to charge (drone, camera, Bluetooth speaker, etc), having a back-up battery for days when you are off the bike and, therefore, not generating electricity, might be important.The problem with batteries is that they take a long time to charge. My 10,000 mA Anker must be plugged in for 10 hours or so to get fully charged. Batteries aren't all that efficient. That is, they take more power to charge than they store. Note that batteries get hot when they are charged (and discharged), which is wasted energy. Another wrinkle with batteries is their ability to charge and get charged at the same time. Such "pass through" batteries allow the PedalCell to charge the battery while, at the same time, the battery charges devices. Neither of the batteries I have can do this. Thus, I have no data on how pass through batteries work compared to the others. I did some testing just to see how much power I could put into a back-up battery. In addition to the Anker, I have a small tube-style "lipstick" battery that, when full, is able to add a 50% charge to my iPhone 12. It is hard to know exactly how much charge is in either of these batteries. While the Anker has 4 LED lights to show its current level, the lipstick one has nothing. The method I used to determine the amount of charge I was able to put in each battery using the PedalCell was discharging the battery completely, charging it on a ride, and then seeing how much charge it could put into my iPhone. Try and Try AgainIn order to evaluate the PedalCell as a useful tool for touring cyclists (Disclosure: I was sent one for free after I requested one to review), I tested it on two fully loaded bicycles on rides between 2 and 4 hours (18 to 36 miles/30 to 60 kilometers). I did these rides around San Francisco with its combination of steep up and downhills, rolling terrain, and few flat sections. I also attempted to put my iPhone under the load I'd expect to use when touring. This includes keeping my cell connection active, playing an audiobook over a Bluetooth headset, receiving texts and emails, recording my route in real-time, taking a few photos, and using voice navigation. My average speed during these rides was around 10 MPH (16 KPH).The things I tested: - iPhone 6s with degraded battery in low power port - iPhone 12 in low power port - iPhone 12 in low power port with a battery plugged into the high power port - iPhone 12 in the high power port - Anker battery in the high power port - iPad in high power port While charging the iPhone 12, I used either MapMyRide or RideWithGPS to record my route continuously. I used either RidewithGPS or Google for voice navigation. I always kept my cell coverage on, as well as, cellular data for emails and messages. I always listened to audio using a Bluetooth headset and took some photos. Here are some basic electrical numbers to keep in mind. My iPhone 12's battery is listed as 2815 mAh (milliamp/hours). My iPhone 6s has a storage capacity of 1715 mAh (and it currently rated at 85% of that). My iPad's battery is listed as 8827 mAh. Put another way, the iPad has 3.25 times the amount of battery storage than the iPhone 12. Powerful ResultsLet me start with my most important finding: Every time I had my iPhone plugged into the PedalCell, in both the low and high power ports, it ended up with more power at the end of the ride than when I started. This means my iPhone would never run out of power when riding my bike with the PedalCall. This removes a major concern I've had since I started relying on electronics to find my way. Given my test results, it would be possible to ride a tour without ever having to charge my iPhone from a wall plug.While the PedalCell has 2 charging ports, the only one that I found useful was the high power one. I can imagine situations where the low power port, with its "always on" charging, would be useful. But, whenever I wanted to charge something, the high power port delivered more electricity, more quickly. The low power port works fine, but at 10 MPH (16 KPH), it simply doesn't produce enough charge for devices with larger batteries. Since faster means more power, it would be possible to change one's charging behavior based on the kind of riding planned for a day. On day's with lots of fast downhill or easy flats, the PedalCell would generate more charge out of both ports. Charging two devices simultaneously didn't work well for me, either. When I plugged two devices into the PedalCell, in my case an iPhone (low power) and a battery (high power), both of them ended up with less added power. This is why a bit of trial and error is needed to determine the best arrangement for using the PedalCell given the mix of devices someone needs to charge and their riding style. I rode with the PedalCell over a dozen times. From the data I collected, I estimate that the PedalCell adds a 10% charge to my iPhone per hour of riding (when using the high power port). That is, if the iPhone started with the battery at 60%, by the end of a 2-hour ride, it would be at 80%. Given what I had running on the iPhone, I estimate that it used about 10% of the battery per hour. So, the PedalCell was actually delivering about a 20% charge per hour. Keep in mind these results are with a brand new iPhone 12. The one time I charged an old iPhone (a 6s with a declining battery capability), it went from 7% at the start to 91% at the end of a 3.5 hour ride (in the low power slot). Thus, it is hard to know exactly how the PedalCell will work until it is tested with someone's particular devices. As an additional data point, one time I rode without using navigation or route tracking on my iPhone. The amount of charge added back to it in 2 hours (high power slot) was an impressive 49%, which isn't too far off 20%/hour. I also tested charging batteries. After a 3.5-hour ride, the fully depleted Anker battery, in the high power port, was able to charge my iPhone to about 85% of my iPhone's capacity. Charging a battery while riding and then charging your devices from the battery is a common way the PedalCell is used. Two of the reviewers on the PedalCell website (review 1, review 2) used this method to keep several devices powered while on tour. Again, I don't have a pass-through battery so didn't attempt such tests. I use my iPhone when I am riding. When I am off the bike, I prefer using an iPad for journaling and entertainment. iPad's have a much larger battery capacity than an iPhone. On the two rides where I charged my iPad, I added between 5% and 7% of charge per riding-hour. Given that the iPad's battery is 3.5 times the size of the iPhone's, this result seems similar to those for the iPhone. All of these results came when charging a single device in the high power slot. On a couple rides, I tried charging 2 devices at once. Every time, the devices involved ended up getting much less charge added then when I charged them separately in the high power port only. As an example, on one ride, I tried charging both my iPhone (low power slot) and the (fully discharged) lipstick battery (high power slot) on a 2 hour ride. This reduced the charge on the iPhone markedly to about 4% per hour (or 14%, when the 10%/hour usage is added in). The lipstick battery got a minimal charge, able to add only 4% to my iPhone. While I will continue to test charging various combinations of devices, at present, it is my opinion that charging 2 devices simultaneously with the PedalCell at the speed I ride is not as efficient as charging them one at a time in the high power port. Getting Dragged AlongThe PedalCell generator comes with a replaceable O-ring (good for 2000-3000 miles/3,300 - 5,000 kms) that creates the friction it needs to run on the rim. As such, turning the generator creates an additional drag as you push the pedals.When turning the generator by hand, it clicks forward several times per rotation. This vibration is easily felt when pushing the bike by hand, as when maneuvering it around so you can mount it. How much I felt this vibration when riding depended on the wheel size of the bike. On the Waterford, a "normal" sized bike with 27-inch wheels, the vibration seemed to go away once I started pedaling. Other than an barely audible hum, I didn't notice it when moving. On the Bike Friday, a folding bike with 20-inch wheels, the vibration was much more pronounced. Enough so that I could feel it when I pedaled. It was neither a problem, nor bothersome. But, it made me aware that the generator was running on the rim. Besides the vibration, it didn't seem like the PedalCell added much, if any, noticeable drag on the bike. While it is possible to disengage the generator when the bike is stopped, I didn't find this necessary, even when riding up the mile long grade to the Golden Gate Bridge (from Sausalito), often against a stiff headwind. Generating Great ServiceWhile the PedalCell appears to be a simple, straight forward piece of equipment, there is a lot to subtlety to using it properly. The PedalCell website contains lots of useful information, videos, reviews, an FAQ and technical details. But, what I found most impressive is the company's commitment to customer support.In addition to a live chat available on the website's home page, there are direct phone numbers and email addresses. Calling (texting) the listed phone number often connected me up with Adam, the CEO, who always spent as much time helping me as I needed. I've communicated with other PedalCell customers who had the same experience. Email responses were always prompt, often within a few minutes. This not only gave me great confidence in setting up and using the PedalCell correctly, but it also helped me learn some of the finer points of its technology. This level of support is impressive (and unusual, in my experience) and a good representation of the kind of company the founders of PedalCell have created. Issues I FoundThere are a few things I need to mention that might cause problems for people who want to use the PedalCell.Given that the dynamo is driven by the wheel's rim, there are only a few places where you can mount the PedalCell on your bike. Namely, the front fork and the seat stays. If you use panniers and racks or attach bags to your fork, you might not be able to find a spot to mount the PedalCell. My recommendation would be to do a bit of research to insure that you can find a spot to attach the PedalCell on your loaded bike. If you are unsure, contacting PedalCell will help immensely. After the PedalCell is fully installed, the PedalCell adds 2 or 3 wires to your bike. One from the PedalCell to the Power Port and one or two from the power hub to devices being charged. I didn't find it easy to arrange these wires to be completely out of the way of everything else. I never had a snag or a snarl, but it did seem that I had a lot of wires hanging around my cockpit.  Wherever someone puts the phone/devices while charging, there will be wires hanging out. Buying shorter charging wires or experimenting with placement of the power hub might result in better wire management. Another option is putting the power port and devices in a pannier or bag. This would hide all the wires but also mean digging around to access any of these devices. While I didn't find the drag from the dynamo a problem, on a long, steep hill any added resistance is unwelcome. In such cases, the dynamo can be disengaged from the wheel. This cannot be done when the bike is moving. To disengage the PedalCell, you have to stop, move the dynamo (possible with one hand after a bit of practice), and then start riding. Since getting started on a hill can be challenging, it would be best to do this before the hill begins. Not a serious issue, but something to be aware of. In order to attach the PedalCell generator to your bicycle, the 2 fasteners that hold it onto the bike need to be screwed all the way in. Depending on where you put it on your bike, the screws may protrude close to, or even into, your wheel's spokes. This happened to me the first time I installed the generator.  There is enough room on my bike and in the set screw for the generator that I was able to maneuver it so that the screws missed my spokes and the generator was positioned correctly. On a long day ride or bike tour, it is possible (it happened to me once) for the generator arm to shift and for the screws to begin making a pinging sounds against the spokes. The metal rim area available for the generator on both of my bicycles is 1/2 inch (1.27 centimeters) wide. If the O-ring should slip off the rim, the strong spring in the generator would pull it into the spokes and likely lead to a serious bike accident. This actually happened to me when, during one of my test rides, I positioned the PedalCell on my chain stay.  At one intersection, as I was starting off, I accidentally kicked the generator off the rim, sending the PedalCell into my rear wheel. The bike came to an instant stop. Luckily, I was going very slow and I managed to get the bike under control without problem. I should note that Adam at PedalCell warned me against putting the PedalCell on the chain stay for precisely this reason! As a result, I do a quick check that the PedalCell is securely clamped on before I start riding. It would also be a good idea to inspect it after riding over rough terrain or particularly bumpy roads. As I mentioned above, if you are charging an iPhone (in the high power slot) and listening to it (music/audiobook) at the same time, it will constantly make a "charging tone" due to negotiations between the PedalCell and your iPhone. At first, I found this annoying. But, after I understood what it was doing and why and that it continually did this, I got used to it and stopped noticing it. The PedalCell system weighs in at 525 grams/ 1.15 pounds. While not a showstopper, it, too, has to go over the hill. By comparison, a 10,000 mA Anker back-up battery weighs about 1/2 pound. Between me and my fully loaded bike, I'm already pushing close to 220 pounds / 100 Kilograms. Given the ability to charge my devices, I think it is a pound worth carrying. But, it is still one more pound to push around. Generating My ConclusionsThe ultimate question for any piece of bike touring equipment: Is it worth its purchase price? As I write this, the PedalCell retails for $300. While I am a frugal guy, when it comes to bike touring, I like to have the best equipment I can. Given the compromises I've made between power usage and applications on my iPhone, I would happily buy this dynamo at that price. There are two reasons.First, it means that my iPhone will never run out of power when I am on tour. A big plus! As a result, I can run more power-intensive apps on iPhone than I currently do without worry. Second, it gives me more options on the kind of electronic equipment I can use when I tour. With the PedalCell, instead of looking for running lights or cameras with replaceable batteries, I can now get USB compatible ones without worrying about them running out of juice in the middle of a ride (and I save the cost and weight of replacement batteries!). Up to now, I've not considered buying a few more electronic "toys," like a GoPRO camera or a drone. While I like to watch the weight of my touring gear, I also am sensitive to carrying devices that need to be charged. Being able to generate my own electricity will widen the choice of things I am willing to bring along when I tour. The PedalCell will make it easier to find places to spend the night as having access to electricity will no longer be a top priority. This will be particularly useful for "off the grid" bike riders. Depending on devices carried, the PedalCell would likely supply much, if not all, of their power needs. Most likely, a storage battery would be needed and charged by the PedalCell and then the devices would be plugged into the battery. A review linked on the PedalCell website (linked above, as well) describes an extreme example of an off-road rider charging several devices from a PedalCell powered 20,000 mAh battery. Nomophobia No Mo'I must confess that I used to have Nomophobia, fear of my cellphone running out of power. As such, I always plugged my iPhone in at night and started each day at 100% power. Even when the phone was close to fully charged, I'd plug it in before I went to bed.In order to test the PedalCell, I've had to leave my phone uncharged so that I could track how much power the dynamo added back into my phone. Now, I realize that charging my phone every night is not necessary, especially if I am planning to ride my bike the next day. In fact, going forward, I intend to rely mostly on my daily bike rides to charge my iPhone instead of the wall socket. While this won't have any impact on climate change or my electric bill, it will make me feel better about using my iPhone! This is yet another, unanticipated, benefit of the PedalCell! |